
Overview
Scribematic is an AI-powered ambient scribe designed to capture provider–patient conversations and transform them into structured, EHR-ready medical documentation.
While most clinicians record visits directly within Scribematic, live recording requires a reliable internet connection. When internet access is limited or unavailable, Scribematic allows you to upload offline recordings or transcriptions for processing and note finalization.
This article explains:
- When to use offline uploads
- Which file types are supported
- How to upload recordings or transcriptions
- How to finalize uploaded encounters into clinical notes
Best Practices & Tips
Offline uploads are designed to help maintain documentation continuity when live recording is not possible.
Common Use Cases
-
In-home visits in remote areas
-
Locations with unstable Wi-Fi or cellular service
-
Temporary internet or service disruptions
-
Backup workflows during connectivity issues
For Best Results
-
Ensure the recording captures clear audio
-
Minimize background noise when possible
-
Record the full encounter from start to finish
-
Confirm the file is fully saved before uploading
Once uploaded, offline recordings follow the same finalization workflows as live-recorded encounters.
Supported File Types
Scribematic supports:
-
Audio files
-
Video files
-
Written transcriptions
You can record your encounter using any device or application, as long as the final file can be uploaded into Scribematic.
Step-by-Step Instructions
How to Upload an Offline Recording
Follow these steps to upload and process an offline recording:
Step 1: Record the Patient Encounter
Record the visit using your preferred device or recording tool, such as:
- Mobile phone (for recording video on your camera or for audio on apps such as “recordings”)
- Digital recorder
- Computer-based recording app
- Telehealth platform (saved locally)
Ensure the recording is capturing clear audio and includes the full encounter.
Step 2: Start a New Note in Scribematic
Once internet access is available:
- Sign in to your Scribematic account
- Go to Recordings and create a new note by selecting “Start”
- Name the New Recording and select “OK”
Step 3: Upload the Recording or Transcription
- Select the Upload Offline Recording option in the top right of the new note
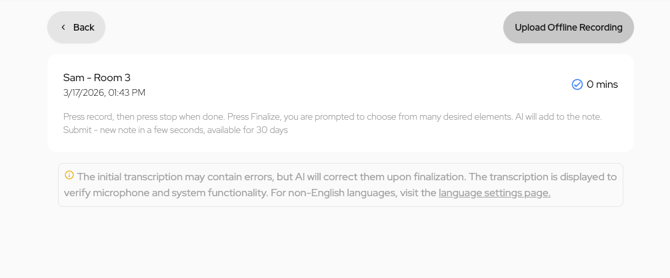
- Choose your saved audio, video, or transcription file
- Allow Scribematic to process the content
Step 4: Finalize the Note Normally
- Select your normal preferred finalization method
- Review the generated note
- Make any necessary edits
- Export or copy the finalized note into your EHR
Additional Resources
If you have questions or would like personalized guidance, our team is available to assist you.
Contact the Scribematic Support team through the in-platform chat icon for assistance or email support@scribematic.ai.
Schedule a free one-on-one Zoom product walk through: Schedule Demo Here
Video Resources: How to Upload Offline Recording