
Overview
Scribematic is an AI-powered ambient scribe designed to capture provider–patient conversations and transform them into structured, EHR-ready medical documentation.
This article answers common questions about using Scribematic during:
- Telehealth visits
- Phone calls and speakerphone encounters
- Multi-speaker conversations
- Multilingual visits
- Audio troubleshooting scenarios
You will learn:
- How to enable Telehealth Audio Capture
- Best practices for capturing clear audio
- How Scribematic handles multiple speakers and languages
- Common troubleshooting steps if audio is not recording properly
Watch this video for more details on multilingual workflows: Multi Language
Best Practices & Tips
As you use Scribematic for telehealth and audio-based workflows, keep the following best practices in mind:
For Best Audio Quality
- Use a quiet environment whenever possible
- Position speakers close to the recording device
- Confirm your microphone is functioning before starting a visit
- Ensure a stable internet connection during telehealth sessions
For Multi-Speaker Encounters
Scribematic distinguishes speakers primarily through conversational context rather than biometric voice recognition.
To improve accuracy:
- Introduce all participants at the beginning of the visit
- Use names naturally during conversation
- Provide contextual cues throughout the encounter
Example:
“I’m Dr. Smith and this is our medical assistant, Sarah. Nice to meet you, Annie.”
For Multilingual Visits
- Scribematic automatically detects the spoken language during the first portion of the encounter
- Live transcription may not appear during non-English visits
- The visit is still being captured and processed normally
- Finalized notes will generate in your preferred output language
Step-by-Step Instructions
How to Use the Telehealth Audio Capture (Beta)
Follow these steps to enable and use the Telehealth Audio Capture feature in Scribematic:
Step 1: Enable the Telehealth Audio Feature
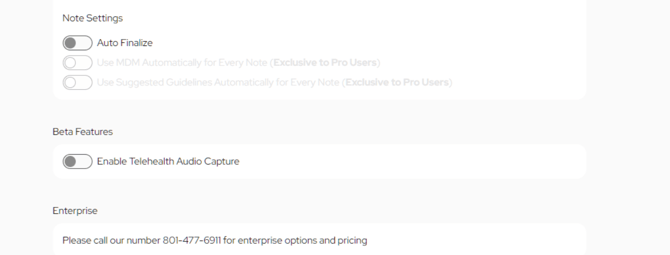
- Go to your Scribematic Account page.
- Scroll down to the Beta Features section.
- Toggle on Enable Telehealth Audio Capture. When enabled, a Telehealth button appears during recording to capture system audio from video calls (Zoom, Teams, etc.) alongside your microphone.
Step 2: Start a Telehealth Recording
- Set up a new recording or visit as you normally would. Select “Start” and name your recording.
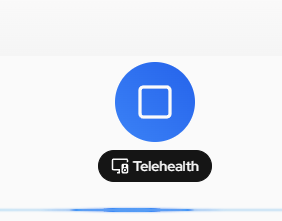
- Tap the blue Microphone button. Once the recording begins, look for a black bubble labeled Telehealth under the blue button.
- Click the Telehealth button to enable audio capture.
Step 3: Choose What to Share
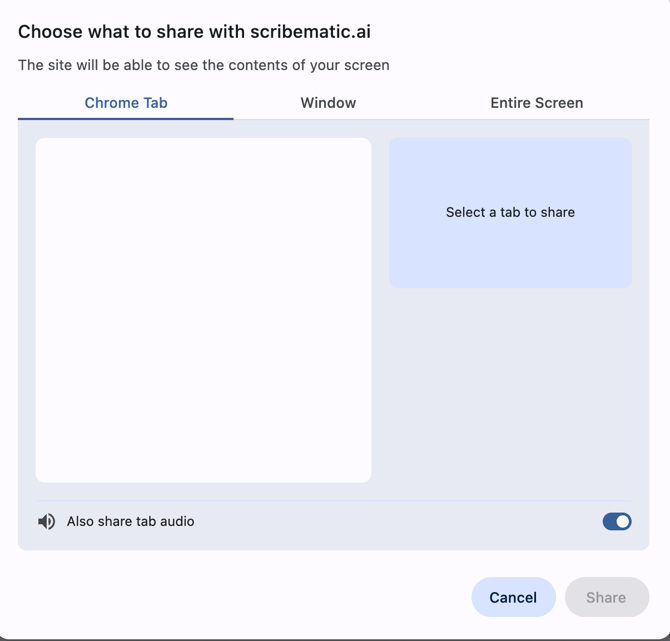
- When prompted to “Choose what to share,” select “entire screen” so Scribematic can capture audio from any tab or window.
- If you choose “window” instead, audio may not be captured if your meeting is in a different tab or window than Scribematic..
- Scroll to the bottom of the prompt.
- Check the box for Also share tab audio to ensure audio is captured during the session.
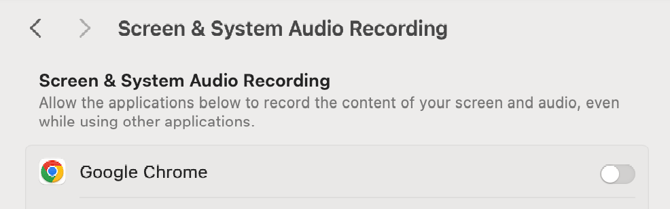
Note:
Depending on the system you are using, a request for permission for access may pop up after step 3. For an example of how this could look, see below:
If I use a speakerphone during calls, will Scribematic work?
Yes. Scribematic works with speakerphone calls.
For best performance:
- Place the speakerphone close to the recording device
- Ensure a quiet environment
- Confirm a strong internet or cellular connection
Clear audio quality directly impacts documentation accuracy.
Multiple People Speaking
Can Scribematic distinguish between multiple speakers?
Yes, in most cases.
Scribematic generally distinguishes between provider and patient well. However, this is done primarily through contextual understanding rather than biometric voice recognition.
To improve accuracy:
- Introduce everyone at the beginning of the visit
Example: “I’m Dr. Smith and this is our medical assistant, Sarah. Nice to meet you, Annie.” - Provide contextual cues during the visit
Example: “Thank you for bringing your daughter, Annie, in today.”
Pediatric and caregiver-involved visits typically work smoothly when participants are clearly introduced.
Mixed Languages & Multilingual Visits
How does Scribematic handle mixed languages?
Scribematic can process multiple languages within a single visit. The AI is fluent in nearly 60 languages.
No workflow changes are required when conducting visits in a non-English language. Scribematic will recognize the language being spoken within the first few sentences. If a visit is conducted in a language other than English, you will not see the live transcription autopopulating as you speak. The visit is still being captured. Once you finish the visit and finalize the note, you will then see the transcription for the visit.
What language will my note be written in?
Your final note will always be generated in your preferred output language, regardless of the language spoken during the visit.
For example:
- If the encounter is conducted in Spanish
- And your preferred output language is English
- Your note will be generated in English
You can update your preferred language under: The default language is English.
Account → Settings → Language Settings
For more details, watch this video: Multi Language
Troubleshooting: Scribematic Is Not Recording
If Scribematic is not capturing audio, the most common cause is that the microphone is not enabled in your browser or system settings.
Follow the steps below to enable your microphone in Chrome.
How to Enable Your Microphone in Chrome
- Open Chrome Settings
- Click the three dots in the upper-right corner of Chrome.
-
- Select Settings.
- Go to Privacy and Security
- On the left-hand side, click Privacy and security.
-
- Then click Site Settings.
- Open Microphone Settings
- Scroll down to the Permissions section.
-
- Click Microphone.
- Confirm Correct Microphone Is Selected
- Ensure the correct microphone device is selected from the dropdown menu.
-
- If using an external microphone or headset, confirm it is connected.
- Check Scribematic Site Permissions
- Under “Allowed to use your microphone,” confirm that Scribematic is listed.
-
- If Scribematic appears under “Not allowed,” remove it and reload the page to allow access.
- Refresh the Scribematic Page
- Return to Scribematic.
-
- Refresh your browser.
-
- When prompted, click Allow to grant microphone access.
- When prompted, click Allow to grant microphone access.
Additional Troubleshooting Tips
If audio still is not recording:
- Restart your browser
- Restart your computer
- Check your system sound settings to confirm the microphone is enabled
- Disconnect and reconnect external microphones
- Ensure no other application is exclusively using the microphone
Additional Resources
If you have questions or would like personalized guidance, our team is available to assist you.
Contact the Scribematic Support team through the in-platform chat icon for assistance or email support@scribematic.ai.
Schedule a free one-on-one Zoom product walk through: Schedule Demo Here
Video Resources: